
The Ancient Art of Hyderabadi Boneless Chicken Biryani — And Why It’s Worth Mastering
Hyderabadi boneless chicken biryani is one of the most aromatic and celebrated rice dishes in the world — and making it at home is more achievable than most people think.
Quick answer: How to make Hyderabadi boneless chicken biryani
- Marinate boneless chicken overnight in yogurt, spices, and lemon juice
- Parboil aged Basmati rice with whole spices to 75% doneness
- Layer raw marinated chicken at the bottom, then top with partially cooked rice
- Add saffron milk, ghee, and fried onions (birista) between layers
- Seal the pot tightly with foil and a lid
- Dum cook on low heat (or bake at 375°F) for about one hour
- Rest for 20–30 minutes before serving
This method is called Kachi Yakhni — the classic Hyderabadi style where raw marinated meat and partially cooked rice finish cooking together, sealed in their own steam.
The result? Rice that absorbs every drop of spiced, aromatic chicken juice. Tender, fall-apart chicken. That unmistakable fragrance that fills the whole house.
The boneless version makes it even more approachable — no bones to navigate, easier to serve, and just as deeply flavorful when marinated properly.
Biryani has roots in the Mughlai culinary tradition, brought to the Indian subcontinent centuries ago and perfected in Hyderabad into something truly iconic. As of July 2026, it remains one of the most searched and cooked Indian dishes globally — and for good reason.
This guide walks you through every step, from marinade to dum, so you can pull it off confidently at home.
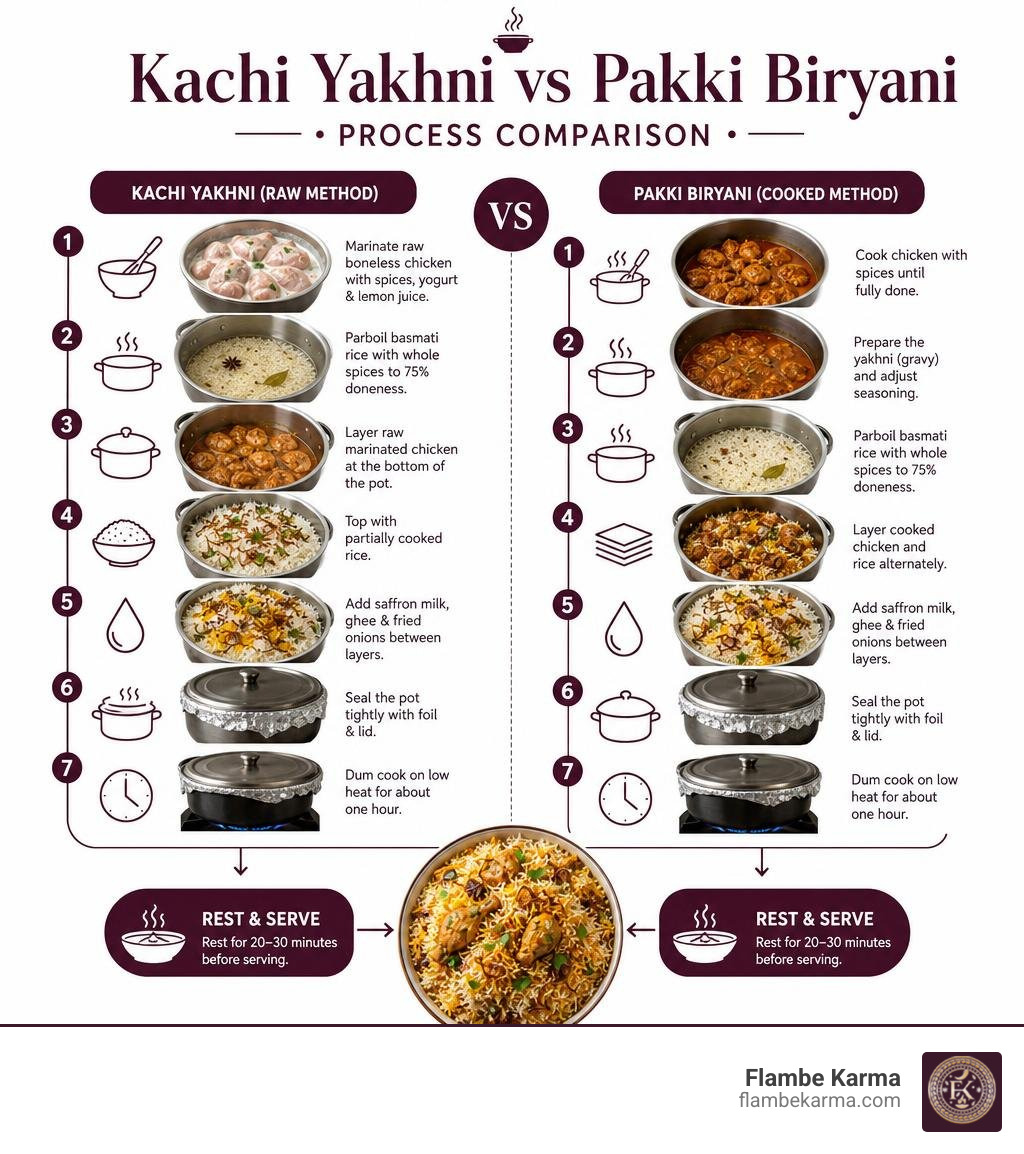
What is Kachi Yakhni and How Does It Differ from Traditional Biryani?
To truly appreciate a great hyderabadi boneless chicken biryani, we must first understand the magic of Kachi Yakhni.
In the vast world of biryani, there are two primary preparation methods: Pakki (cooked) and Kachi (raw).
- Pakki Biryani: The meat is fully or partially cooked into a rich gravy before being layered with parboiled rice and steamed. This is a safer, more forgiving method often used in restaurant kitchens to ensure speed and consistency.
- Kachi Yakhni Biryani: Raw, heavily marinated meat is placed at the absolute bottom of a heavy pot. Partially cooked, warm Basmati rice is layered directly over this raw meat. The pot is then sealed hermetically. As the pot heats, the juices from the raw meat vaporize, rise through the rice, and cook the entire dish in a closed loop of pure flavor.
Using boneless chicken for a Kachi Yakhni preparation was once considered a culinary gamble. Traditionalists argued that bones are essential because they release marrow and gelatin, which keep the meat moist and flavor the rice. However, as modern home cooking has evolved into July 2026, the demand for a clean, bone-free dining experience has made the boneless variation incredibly popular.
To make this work without drying out the chicken, we rely on a long, acidic marination process and the use of Sella Basmati rice. Sella Basmati is parboiled in its husk before milling, making the grains sturdier, harder to overcook, and less likely to turn mushy during the long steam phase.
If you are curious about how this technique fits into the broader landscape of South Asian culinary arts, you can read more about Signature Dishes That Bring Flair to Indian Cuisine. For a deeper dive into the family-style roots of this raw-meat method, take a look at the traditional Hyderabadi Boneless Chicken Biryani {Kachi Yakhni} approach.
Mastering Hyderabadi Boneless Chicken Biryani: Essential Ingredients
An authentic biryani is only as good as the ingredients you put into it. There are no shortcuts here; using stale spices or low-grade rice will result in a bland dish.
To set your kitchen up for success, we recommend starting with a well-curated pantry. You can build your foundation by reviewing A Traditional Indian Food List for Your Kitchen.
For this recipe, you will need:
- Aged Basmati Rice: Look for premium brands labeled “aged” (ideally 1 to 2 years). Aged rice loses its moisture, allowing the grains to expand into long, separate needles that scatter like pearls rather than sticking together.
- High-Quality Ghee: Pure clarified butter is the lifeblood of biryani. It adds a rich, nutty aroma and prevents the rice from drying out.
- Saffron: Do not skip this! Steep a generous pinch of saffron threads in warm milk for at least 20 minutes to create a golden, fragrant liquid.
- Yogurt (Curd): Use fresh, whole-milk yogurt. Avoid sour or low-fat yogurt, which can split during cooking and ruin the texture of your marinade.
- Homemade Biryani Masala: While store-bought is convenient, grinding whole spices (cardamom, cinnamon, cloves, mace, nutmeg, and shahi jeera) at home elevates the dish to restaurant-quality.
Because boneless chicken behaves differently than bone-in cuts under heat, we must adjust our preparation techniques accordingly:
| Feature | Bone-In Chicken Prep | Boneless Chicken Prep |
|---|---|---|
| Ideal Cut | Thighs and drumsticks | Thigh fillets (highly recommended) or thick-cut breasts |
| Marination Time | 2 to 4 hours | 4 hours to overnight (crucial for tenderizing) |
| Heat Sensitivity | Forgiving; bones protect against drying out | High; prone to drying if overcooked |
| Fat Content | Naturally high | Low to moderate (requires extra ghee/yogurt) |
| Cooking Window | 45 to 60 minutes | 35 to 45 minutes on low heat |
Sourcing and Preparing the Perfect Birista (Fried Onions)
If biryani is the king of Indian dishes, then birista—deep-fried onions—is its crown. Birista provides a sweet, savory, and caramelized depth that cannot be replicated by raw or sautéed onions.
To make perfect birista:
- Peel and slice red onions as thinly and uniformly as possible. If the slices are uneven, the thin ones will burn while the thick ones remain soggy.
- Heat a generous amount of ghee or neutral oil in a wide pan over medium heat.
- Fry the onions in batches. Do not crowd the pan, or they will steam instead of fry.
- Stir constantly as they begin to turn golden. Onions can go from perfectly golden to bitter and burnt in a matter of seconds.
- Remove them from the oil just before they reach your desired shade of brown, as they will continue to cook and darken from residual heat after being drained.
- Spread them out on paper towels to cool and become crisp.
For a classic reference on how to balance these aromatics in your base, you can consult Hyderabadi Chicken Biryani – Swasthi’s Recipes.
The Art of Marination and Layering
With your ingredients prepped and your birista cooling, it is time to build the foundation of your hyderabadi boneless chicken biryani. This is where the magic happens.
How to Marinate Boneless Chicken for Maximum Flavor
Because boneless meat lacks the natural moisture-retaining properties of bone-in cuts, your marinade must do double duty: infuse deep flavor and tenderize the meat fibers.

For the absolute best results, use boneless, skinless chicken thighs cut into generous two-inch pieces. Chicken breast can be used, but it requires a shorter cooking window and a highly acidic marinade to prevent it from becoming chalky.
In a large bowl, whisk together whole-milk yogurt, fresh ginger-garlic paste, lemon juice, green chilies, red chili powder, turmeric, garam masala, chopped mint, cilantro, a splash of oil (or leftover onion-frying oil), and half of your prepared birista.
Pro Tip: Add a teaspoon of raw papaya paste to the marinade if you are using chicken breast. Raw papaya contains papain, a natural enzyme that breaks down tough proteins, ensuring your boneless chicken remains incredibly succulent.
Cover and refrigerate the mixture for at least 4 hours, though letting it sit overnight is highly recommended.
Step-by-Step Assembly of Hyderabadi Boneless Chicken Biryani
Layering is an architectural process. Done correctly, it creates a beautiful contrast of white, yellow, and orange rice grains interspersed with tender meat.
- The Meat Base: Spread the cold, marinated boneless chicken in an even layer at the very bottom of your heavy-bottomed cooking pot. Do not cook it first!
- The Rice Prep: Wash your aged Basmati rice until the water runs completely clear to remove excess starch. Soak it for 30 minutes. Boil a large pot of water salted “like the sea” with whole spices (cloves, cardamom, cinnamon, bay leaves).
- The 75% Rule: Drop the rice into the boiling water. Watch it closely. You want to cook it until it is al dente—about 5 to 7 minutes. The grain should be long and bendable but still have a firm, uncooked core when pinched between your fingers. Drain immediately.
- The First Layer: Gently spread half of the hot, drained rice directly over the raw chicken.
- The Mid-Layer Garnish: Sprinkle a handful of birista, chopped mint, cilantro, a drizzle of saffron milk, and a spoonful of melted ghee over the rice.
- The Second Layer: Add the remaining rice on top.
- The Final Touch: Pour the rest of the saffron milk in streaks across the top to create beautiful color variation. Drizzle more ghee around the edges of the pot to help steam release.
- Create Steam Holes: Using the back of a wooden spoon, gently poke three or four vertical holes through the rice layers down to the bottom of the pot. This allows the steam generated by the raw chicken juices to rise evenly through the rice.
To see a variation of this assembly process, you can explore Hyderabadi Special Chicken Dum Biryani | Boneless Hyderabadi Dum Biryani — Crunchy Kitchen.
Achieving the Perfect Dum (Steam Cooking)
Dum pukht is the ancient culinary technique of slow-cooking food in its own steam. To achieve this at home, you must create an airtight seal so no moisture escapes.
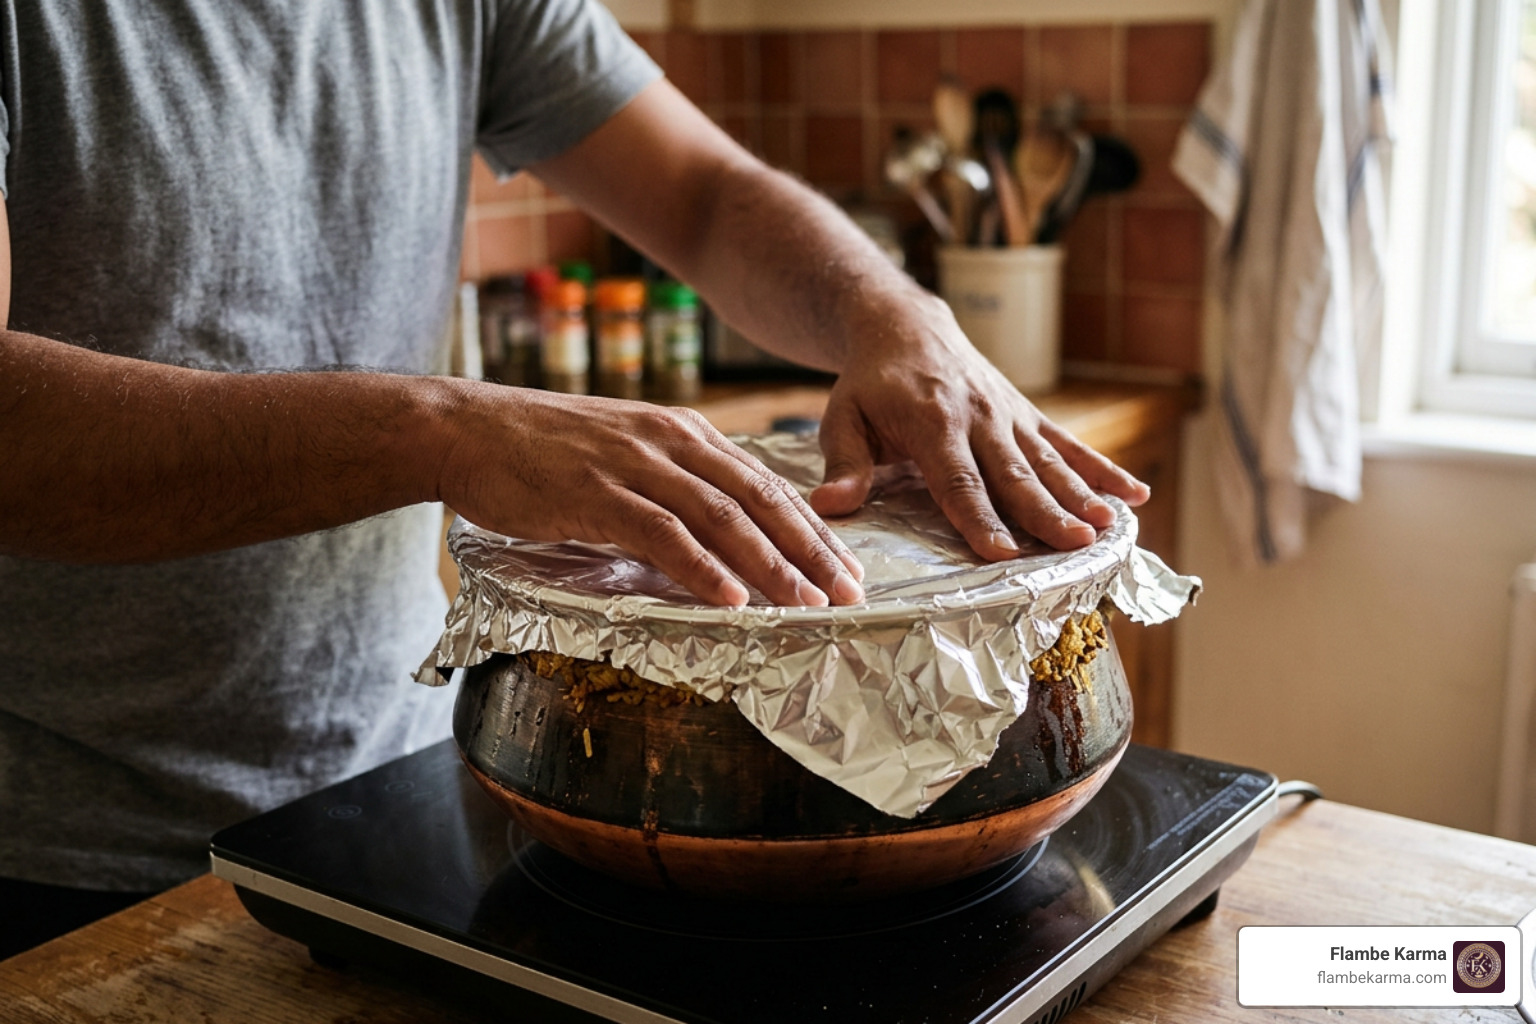
Traditionally, chefs used a rim of wheat dough to seal the lid to the pot. A highly effective modern alternative is to cover the top of your pot with a double layer of heavy-duty aluminum foil, press it firmly down around the edges, and then place a heavy lid on top.
The Stovetop Tawa Method:
- Place your sealed pot on medium-high heat for 8 to 10 minutes. This quickly heats the bottom of the pot, gets the raw chicken juices boiling, and starts the steam generation.
- Once you see a whisper of steam escaping from the edges (or hear the sizzle from within), lower the heat to the absolute minimum.
- To prevent the bottom from scorching, place a heavy cast-iron skillet or flat griddle (tawa) directly onto your stove burner, and set your biryani pot on top of the tawa. This diffuses the heat beautifully.
- Keep it on low heat for 30 to 35 minutes.
The Oven Method:
- Alternatively, you can bake your sealed pot in a preheated oven at 375°F (190°C) for 45 to 50 minutes. The oven provides perfectly even heat from all directions, which is excellent for boneless chicken.
The Golden Rule of Dum: Once the cooking time is up, turn off the heat but do not open the lid. Let the pot rest, undisturbed, for 20 to 30 minutes. This allows the steam to settle back into the rice grains, making them firm and preventing them from breaking when you fluff and serve the dish.
Serving Suggestions and Accompaniments
Biryani is a complete meal on its own, but the right side dishes can balance its rich, spicy profile.
- Mirchi Ka Salan: A traditional Hyderabadi gravy made with green chilies, peanuts, sesame seeds, and tamarind. Its nutty, tangy flavor profile pairs perfectly with the spiced rice.
- Raita: A cool, refreshing yogurt dip made with grated cucumber, toasted cumin powder, and fresh mint. The creaminess cuts through the heat of the biryani.
- Fresh Mint Chutney: A bright, herbaceous condiment that adds a clean, zesty finish to every bite.
If you are hosting a festive gathering and want to create a full multi-course feast, consider pairing your biryani with some of the Best Indian Appetizers to kick off the meal.
Common Mistakes to Avoid with Hyderabadi Boneless Chicken Biryani
Even experienced home cooks can run into trouble with Kachi Yakhni. Keep these common pitfalls in mind:
- Overcooking the Rice: If your rice is cooked past 75% before layering, the steam from the chicken will turn it into a mushy porridge. Err on the side of undercooking.
- Using Sour Curd: If your yogurt has been sitting in the fridge for too long and has turned sour, your gravy will taste unpleasantly acidic. Stick to fresh, mild yogurt.
- Insufficient Salt: Rice absorbs a massive amount of salt. If you do not salt your boiling rice water generously, the entire dish will taste flat, no matter how spiced your chicken is.
- Burning the Bottom: If you do not use a heavy-bottomed pot or a heat diffuser (tawa), the direct heat will scorch the raw chicken before it has a chance to cook through.
Frequently Asked Questions about Hyderabadi Biryani
Can I use chicken breast instead of chicken thighs for boneless biryani?
Yes, you can use chicken breast, but you must be careful. Because chicken breast lacks fat, it can dry out quickly during the long steam phase. To prevent this, cut the breast into large, thick chunks (about 2.5 inches), marinate them overnight in a full-fat yogurt base, and consider adding a tablespoon of oil or ghee directly to the marinade to help retain moisture.
What is the difference between Kachi and Pakki biryani?
In Kachi biryani, raw marinated meat is layered with parboiled rice and cooked entirely from scratch inside the sealed pot. In Pakki biryani, the meat is cooked into a finished curry before it is layered with cooked rice and steamed. Kachi biryani is more challenging to master but yields a far more cohesive, deeply aromatic flavor profile because the rice absorbs the raw meat’s pure cooking juices.
How do I prevent the bottom layer of biryani from burning?
To protect the bottom layer, always use a heavy-bottomed pot (like a Dutch oven or a heavy clay pot). Always cook on low heat, and place a flat griddle or cast-iron tawa under your pot to act as a heat diffuser. Additionally, spreading a thin layer of ghee or oil at the bottom of the pot before adding the marinated chicken creates a protective barrier.
If you are looking to enjoy this legendary dish without the kitchen cleanup, you can read about the local culinary scene in our guide to Hyderabadi Biryani Buffalo Grove.
Conclusion
Mastering the raw-meat Kachi Yakhni method is a true badge of honor for any home cook. With patience, high-quality aged Basmati, and a perfectly sealed pot, you can recreate the iconic flavors of Hyderabad right in your own kitchen.
At Flambe Karma, we believe that dining should be an artistic, memorable experience. If you would rather sit back, relax, and let our expert chefs handle the fire, we invite you to join us at our locations in Buffalo Grove and Glen Ellyn, Illinois. Come experience our beautiful, artistic ambiance, exceptional service, and our famous signature dishes.
Ready to plan your next meal with us? Explore our full selection of Indian and fusion favorites on our Menu Indian Food Buffalo Grove IL page and book your table today!